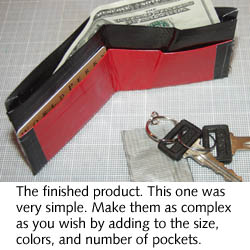
- MATERIALS
- Using a dollar bill as a measuring tool, cut two strips of duct tape slightly larger than your bill.
- Join the two strips along the long edge, overlapping them by 1/2 inch.
- Flip the the first strips over and tape the back side, making sure to overlap the outer edges by 1/2 inch.
- Flip it over again and trim the corners at a 45 degree angle.
- Fold the 1/2 inch overlap over to make sealed edges.
- Make a second sheet, this time slightly smaller than the first (but still larger than your dollar bill).
- seal the top edge, but use the bottom and side overlaps to seal this sheet to your first (this makes a pocket & your basic wallet structure)
- To add ID or credit card pockets, you'll make a sheet (just like we did above) that is the same length as your wallet, but about half as tall (you will probably only need one strip of duct tape for each side of the pocket)
- Cutting board
Duct Tape (any color)
Ruler
Exacto knife
INSTRUCTIONS

For more images go to The Duct Tape Guys
Source: The Duct Tape Guys

JUICE POUCH COIN PURSE
- MATERIALS
- Carefully cut the sides, top, & bottom of the drink pouch, so that the front and back are now two separate pieces. If you like, with the scissors, go ahead and round the edges of the top and bottom (see picture above)
- rinse with water, making sure the pouch pieces are clean, and pat or air dry.
- Fold each of your pouch pieces into thirds. One will be the front of your purse, the other will be the back, with the velcroed flap.
- For the front of your purse: keeping the top third folded back, unfold the bottom third, so you now have two-thirds of the pouch showing.
- With your sewing machine, stitch the top (folded) edge
- Sandwich the two pieces together, right sides out, and stitch around the edges using a zig-zag pattern. (you may need to tape the pieces together to make sure they don't slip while you're sewing. If you like, fold the finishing tape around the edges before you begin stitching, to give it a more finished look
- Attach the velcro on the underside of the flap, and on the front of the purse.
- Empty drink pouch
Scissors
Velcro
Finishing | hem tape
needle, thread &/or sewing machine
tape
INSTRUCTIONS

PULP FICTION COIN PURSE
- MATERIALS
- Remove the cover from the book.
- Cut your book cover, paper, and vinyl so that each measures 7" by 4"
- Find the middle of the book cover and mark it with a horizontal line.
- From the top, measure one inch down and make another horizontal line.
- Do the same for the bottom.
- Now fold along the lines you made.
- Place the vinyl over the book cover, lining up the edges. Use paper clips to hold them together as you attach the snaps.
- Using the same measurements as Steps 3-6, mark three horizontal lines on your paper and fold.
- Getting out your paper clips again, place the paper lining on top of the book cover, fold over the edges, make sure it is all even, and clip the folded edges in place.
- Make sure the paper clips are not in the way of your needle before you start sewing. By sewing the edges together you
are attaching the lining to the book cover and forming the pockets by way of the folded edges.
Sew as close to the edge as you can.
You may choose to use a contrasting color of thread of decorative stitches.
- One paper back book.
- The cheesier the cover, the better. Paperbacks come in a variety of sizes, but look for one that is at least 7" high and 4" across.
Sturdy paper or card stock.
Clear vinyl
Snap Faster Kit. check your fabric store around the velcro and other closures.
Sewing machine & thread
INSTRUCTIONS
Source: Eat Your Heart Out Martha

IPOD NANO CASE
- MATERIALS
- Print out the iPod Nano Pattern
- Use it to cut out the pattern on whatever material you're using. If using duct tape, place tape directly on the back of the pattern and trim.
- If you would like a protective window over your iPod Screen, place clear packing tape on both sides of the window opening.
- Fold along the dotted lines, & glue or tape the flaps in place.
- iPod Nano Pattern (PDF)
glue or tape
exacto knife
ruler
You can use any material to make the cover:
- cereal boxes | paper board
duct tape
fabric | felt
vinyl...
INSTRUCTIONS
Source: Sneakmove.com
No comments:
Post a Comment