New Year's eve is the best time of the year. Partying, dancing and boozing all night, it certainly calls for a super duper celebration. But for those whose birthday falls on the same date, it can be pretty unfortunate at times. Considering that most of us are busy partying and planning for the new year, they sure feel left out. But hey, here are some really cool gift ideas that will undoubtedly cheer them up.
Handpainted “Leopard-tini” Martini Glass- Terrific gift for those who love animal prints. Its a virtual safari experience.
Personalised Engraved Wine Stopper – Its sleek design makes it a perfect piece to showcase your single initial monogram while serving guests with signature style.
Year Long Wish Candles- These candles will light up your lives with joy, love, fun, adventure, luck, wealth, peace, health, longevity, success, balance and comfort.
Aroma Therapy Gift Set (Massage Oil Relaxation)- Well, you can imagine how elated the birthday girl/boy would be to receive this marvelous gift.
Dinner Cruise (Multiple Locations)- This is meant for all travel enthusiasts. Its certainly the best birthday and the most romantic gift on my list.
Snack Well New Year Gift Basket- Who say's snacking is bad? With the bright & colorful design, you can select cookies that are low in fat. Low fat pretzels, Fig Newtons, Snackwells Cookies, assorted flavored fruit snacks and assorted granola bars add a festive touch to healthy snacking. Perfect idea for beginning those healthier New Year resolutions!
Diamante Jewelery Set- This stunning gift is sure to turn quite a few gifts. Your girlfriend or wife is bound to fall in love twice over with you after receiving it.
Over The hill Survival Kit (Make Up and Anti Aging accessories) - Just an excuse to say 'You are so young and bubbly at heart, may you always stay this way' .
Girl's trendy Night out T shirts- A smart and flirtatious T for a perfect New Year's eve party.
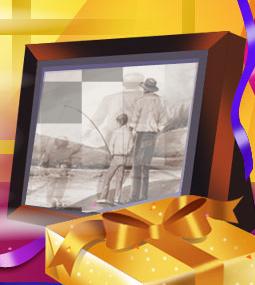
Wall Gallery Frame Set- With so many friends, loved ones and relatives in their lives, one frame would never be enough. Allow them to display everyone in these six wooden frames. The collage style makes it easy to create an instant gallery.
Have a great year ahead guys and gals and celebrate in style. Happy New Year.
Romantic Birthday Gift Ideas For Him

“If God is the DJ, then Life is the dance floor; Love is the rhythm, and You are the music”
What happens when in love? We tend to grow more careful about our appearance, conscious about the apparel and make up we wear. Life takes a different turn. We finish our mundane daily activities with swift energy only to meet him for an hour at the restaurant or movie theater. We secretly smile while cherishing the moments spent talking and canoodling the man of our dreams. Days pass by in trying to figure out the one special and unique birthday gift that your loved one will treasure all his life. But finding that perfect gift is certainly not an easy job, so thought I would help you out a little.
- Write your love messages on small strips of paper and insert them inside 10 fortune cookies. Decorate a basket, add wine and these cookies (nicely wrapped ) and send them to him ten days before his birthday. Write a note asking him to open one each everyday. I bet he will never be able to forget this beautiful gift ever.
- Message in a bottle- Write a touching poem expressing your love and appreciation for him on a scented parchment. Place it inside a slightly wide mouthed bottle along with shells, sand, a miniature palm tree and send this classic romantic gift to him.
- Love Songs- Compile a list of his and your favorite songs. Record them in a CD.
- Flood his mail and email with a birthday greeting card every day for a fortnight and decorate his room with flowers, balloons as well.
- Take a picture of the two of you. Cut in into small pieces like the ones in a jigsaw puzzle. Plce them in a bowl and then ask him to complete the puzzle. After he has successfully finished, present him with a pair of jigsaw puzzle cuff links made of luminous silver.
- This one is really yummy and too romantic to be done without. Plan a chocolate spa treatment session for him and...carry it out yourself.
If he is a late riser, gift him a love heart clock with your own message inscribed on it and a nice and loud alarm as well. He will never keep you waiting for the rendezvous with him after that. - Plan a picnic to a remote spot- Fill the food basket with wine, chocolates and creamy cakes, sandwiches and perhaps a few aphrodisiacs to add spice to the already sizzling romance.
- A custom photo frame or a scrapbook filled with both your pictures, love quotes and his college/school life pictures to freshen up his memories.
A romantic candlelit dinner, a trip to a Hawaii or other beach islands, clothes specially personalised T-shirts, a ticket to his favorite ball game and permission to spend a night out with his old buddies are other gift ideas that are sure to enrich the passion and love in your relationship.
Birthday Gifts For Dad
 A pillar of strength, a guardian angel, a loving husband and a doting father. The spontaneous energy and magnetic personality this man possesses is mesmerizing. He may be poor at changing diapers but he can play with the baby for hours and hold her in his arms while she sleeps. My dad still makes breakfast every morning, he is an early riser and no matter how late he parties (Yes! He is still very young at heart), the first stroke of dawn and he is up the next day with no complaints at all.
The list of gifts given below is meant for this special man in our lives. Check it out and enjoy:
For the Active dad
Wood Chess Set- Features brown and ivory chessmen and a walnut root chess board with inlay border. Great to give as a gift for a golfer who enjoys playing chess.
The Retractable 18ft Golf Ball Receiver
A gym bag for the gym friendly dad or buy him tickets to an upcoming game
Freestyle Tracer Pedometer- accurately tracks distance in miles, kilometers or steps and calculates calories burned.
101 Piece Tool Set ($117.95)- Components: Screwdrivers Bit sets, Allan wrenches, Pliers, Hammer Wrenches, Adjustable wrench, Retractable box cutter, Mini screwdriver set, Ratchet set Tape measure etc.
Poker set- Turn his parties into jazzy poker nights with this amazing game set.
For tech savvy dads
Panasonic Lumix DMC-LX1K Black Digital Camera $329.99
USB cup warmer $9.95- For dads who love to have their coffee or tea steaming hot all morning long.
Laptops, DVD players, or iPods
Printing Mail Box- Emails from family and friends are automatically printed with pictures. Daily news, puzzles and recipes also made available in a jiffy.
For the Party Lovers
Retro Music System
Wine glasses or double walled beer glasses
Elvis Drinking Glasses ($7.50)
Abbey Road Beatles Alarm Clock ($8.95) – Is your dad crazy about Beatles? Mine is. He has collected innumerable records and plays them for all his friends. Guess this gift will remind him of the rocking 60s once again.
Bar Butler ($29.95)- Just get a glass and place it beneath the leak-proof dispenser and make merry.
Food baskets, Spa treatments, Eye and Back Massagers, Cologne, Do it yourself electric back hair shaver, Mini Scrapbook decorated with stamps, T shirts, jackets and accessories like wallets, watches, Pens and Books are other excellent gifts you can surprise your dad with.
Spend some quality time with him, it will make him feel really special and don't forget to send him wonderful e-cards as well. May his day be as wonderful as he is...always.
Gifts Cherished Forever: Journey Down Memory Lane
 Hey! Merry Christmas and a Happy New Year. I love this time of the year. It gives me an opportunity to chill out with friends, family and hardly concern myself with work or meeting deadlines. You all must be wondering where I have exactly been for the last two weeks. Well, my friends and I had planned a trip to Hawaii! It was the best and the most wonderful sojourn ever. The long sandy beaches and the resplendent glow of the mellow sun beckons me every time I close my eyes even now. If there is a paradise on earth, it is there for sure.
Had an amazing Christmas party at my place this weekend after returning. We talked, we laughed, we ate, we drank and danced till the wee hours of the morning. And finally today I decided to return to my darling blog. I have been making posts on birthday gifts for all and sundry but today I decided to go down memory lane and write about some of the cherished gifts I have received over the years.
My grandma is clever at knitting. All my life, I have worn scarfs and ponchos knit by her. Every year till date, she knits something special for me on my birthday. It all began with mittens when I was just a baby, and the tradition continues. She is a sweetheart.
Strawberry Shortcake dolls were a craze during the 1980s. I was not much of a doll lover, in fact toy cars fascinated me more. But this doll with its sweet strawberry scent captured my interest and receiving the same on my third birthday from dad was so cool. Pound puppies produced by Mattel, and Digital Pet were two other toys I still cherish. My mom is a bit allergic to pets, so she never let me keep one. Naturally, I satiated my passion for pets through these stuffed toys and virtual pets.
Easy Bake Oven was the next best gift in line for my 10th birthday. I used to watch commercials featuring this toy but had never quite imagined it would prove to be a source of such entertainment once my maternal aunt gifted it to me.
I began dating at 14, was so tomboyish that dating seemed more of a joke to me initially. But on my 15th birthday, a cute guy presented me a beautiful bracelet with my name etched on it. He even took me out on a date to watch 'Gone With The Wind'. His car was packed with large bunches of roses and they all smelt so good. I still call that my most romantic night out.
Attended a live U2 concert in 1997, tickets gifted by my godfather, Greg. Oh! What a delightful experience that was.
Next is the one most comical yet adventurous gift my brother gave me. He organized a trip to a remote island with our friends for two days. Unfortunately, he had a tiff with his girlfriend and forgot all about the food. To top it all, he messed up the dates and instead of asking the boatmen to arrive after two days, he told him to pick us up four days later. Like castaways we then began to hunt for our food. It was tiresome but inspired by Robinson Crusoe and being accustomed to camping, we managed rather well. I would say the blunder turned into a really memorable and one of a kind gift.
This year, went para gliding with friends. A gift it takes just one word to define - AWESOME!
Each and every gift I have received till now are unique in themselves. For me, what ultimately matters is not the gift but the emotion and affection reflected in people's wishes. Its truly an honor to be loved and remembered by those you cannot live without.
So, whats on your list of favorite birthday gifts?
64. Personalized Blend Coffee

MATERIALS:
- 1 lb. ground coffee
1-2 tsp. spice (ground cinnamon, cardamum, nutmeg, vanilla bean...)
coffee bag with coated lining
ribbon
label (PDF)
INSTRUCTIONS:
- Mix one or two teaspoons of cinnamon or nutmeg into a pound of freshly ground coffee beans; or scrape the seeds from four vanilla beans with a paring knife, and add them to a pound of coffee. For the best flavor, use a medium-bodied coffee, such as one from Kenya or Colombia. Scoop into a coffee bag with a coated lining, available at kitchen-supply stores. Finish with a ribbon and a decorative sticker.
Source: MarthaStewart.com
Clip-on Measuring spoon

MATERIALS
- Metal measuring spoon (Tablespoon)
Metal tie clip
metal to metal adhesive
INSTRUCTIONS
- have yourself the early morning fumble for a measuring spoon by clipping one to your sack of dark roast. This makes a lovely housewarming gift as well. Simply use multipurpose adhesive (one intended for metal-to-metal applications) to affix an inexpensive tie clip to a metal measuring spoon. Be sure to hand-wash the spoon to prevent glue from dissolving.
Resource: Martha Stewart
| Holiday Inspirations: Enjoy the Holiday Season With These 40 Easy Ideas for Recipes, Gifts, and Decorations | |
 | Lift the little snap--part of its cover design--and you'll find idea cards with a durable finish and beautiful photography. This book is the perfect price of mini gifts or stocking stuffers. was $12.95 now $10.36 | Buy Now |
63. Lotion Bar

Easy Lotion Bar
- MATERIALS:
- Melt the beeswax and cocoa butter in a glass container in the microwave, or a clean pot on the stove.
- When it is completely melted remove from heat and add the almond oil.
- Then add your fragrance and/or coloring.
- Pour into your mold (this can be deodorant tubes, soap molds, ice cube trays, muffin tins, etc) and let set up completely.
- 2 oz beeswax
1 oz almond oil
1 oz cocoa butter
Fragrance (by the drop, until it is the scent you want)
soap mold
INSTRUCTIONS:
Extra Rich Lotion Bar
- MATERIALS:
- Melt beeswax on low heat.
- When melted add the mango butter.
- Remove from heat when mango is almost melted.
- Add the other oils, and mix together. Add your fragrance, and/or coloring.
- Pour into your mold and let set completely.
- 3 oz beeswax
2 oz mango butter
1 oz almond oil
1 oz jojoba oil
1 oz hemp oil
Fragrance
mold
INSTRUCTIONS:
Resource: make-stuff.com
62. Hand Warmers

MATERIALS:
- Ceramic Pie Weights
2 3"x5" pieces of thick wool or heavy cashmere
embroidery floss
scissors
needle
INSTRUCTIONS:
- Cut out two 3-by-5-inch rectangles.
- Sew together on three sides, leaving a 1/4-inch seam allowance; cut off corners. Turn bag right side out;
- fill with 1/2 cup pie weights.
- Blanket-stitch all sides with embroidery floss.
Vary the volume of weights to produce warmers that fit the hands of everyone in your family.

Source: MarthaStewart.com
61. Solid Perfume

This is an inexpensive and easy way to create a personalized scent for a nifty gift.
The only ingredient that can get expensive is the essential oils, especially if you make a complex scent blend requiring an initial investment of many different essentials. Of course, there's nothing wrong with picking a single pleasant scent. One bottle of an essential oil will make lots and lots of perfume; you use only drops at a time!
MATERIALS:
- 1 tablespoon Beeswax (available at craft shop)
1 tablespoon Almond Oil (or Jojoba Oil or Vitamin E - available at natural foods/health store)
8 - 15 drops Essential Oils (available at natural foods/health store)
a pan
a small glass bowl or jar (to use in conjunction with the pan as a double boiler)
a straw (used for stirring wax when melted)
1 container (preferably glass, ceramic or stone but plastic is acceptable)
INSTRUCTIONS:
- Put about an inch of water in a small saucepan, then put a small glass jar or pyrex bowl in the water. Measure out the wax and almond oil into the jar/bowl and bring the water around it to a boil.
The wax will melt gradually; when it is 100% liquid, remove from heat and stir in the other ingredients with a straw (the wax will start to form solid on whatever you do your stirring with — a straw has little surface area so you lose less of the end product, and it's disposable so you don't have to clean it off). When everything is thoroughly mixed together, pour the liquid wax immediately into your final container. In about 30 minutes, it will be cooled, solid and ready to use. - To use the perfume, simply rub a finger around on the surface of the waxy perfume, then rub that finger on the area you want to smell good — the inside of your wrists and behind the ears works well.
- Some tips for devising the ultimate scent recipe:
- combine drops of various essentials, totalling 8 -15 drops in all
- pick a primary scent and use more of that one, then one or two "background" scents, using less of each
- check out various aromatherapy sites for info on the psychological properties of various scents
Some nice essentials for background scents are:
- clary sage (a slightly smoky herbal scent that's supposed to help creativity and concentration)
- orange or ginger provide a warming sensation (good for people who are always cold)
- ylang-ylang is a floral that isn't too sweet or girly for guys, but it's a happy smell and subtle enough for a backdrop
- cedar (repels insects)
Scent Recipes (and purported aromatherapy effects):
- For Men:
- 6 drops essential oil of pine (confidence)
4 drops essential oil of ylang-ylang (mood-elevating, energizing)
3 drops essential oil of clary sage (concentration and creativity) - For Women:
- 5 drops essential oil of ginger (sweet and warming)
4 drops essential oil of orange (warming, mood-elevating)
2 drops essential oil of ylang-ylang (mood-elevating, energizing)
2 drops of clary sage (concentration and creativity)
Source: Instructables.com
60. Japanese Bound Handmade Books

MATERIALS:
- writing or drawing paper (20-30 uniform sheets)
thick decorative paper or cardstock (for the cover)
a Binder clip large enough to hold all of your paper in place
Ruler
Pencil
waxed linen thread (can be found in the jewelry section of craft stores)
Bookbinders needle (or a curved needle, found in the sewing section of most craft stores)
a non-tapering awl, or needle tool (to pierce holes in the paper)
INSTRUCTIONS:
- Stack your paper, with the covers on the top and bottom of the stack, just as you would like your book to appear.

- Using a ruler, draw a line from top to bottom of the front cover, about 1/4"from the spine. Make two marks on this line, one 1/4' down from the top of the book, the other 1/4" up from the bottom. Now divide the distance between these marks into thirds and mark the two middle points.
- Even up the pages and clamp the book together with binder clips, or weight down the front edge to keep the pages from moving. Protect your work surface with a piece of scrap wood or an old phone book as you punch a hole at each of the marked points using the awl.
(note: you can also use this technique to repair books that have loose bindings. Making these holes should not damage the text in the book. Most paperback books have an inner margin of 1/2" to 3/4", leaving plenty of room for rebinding.)
- Thread the needle and tie the ends together with an overhand knot. Open the book a few pages and, next to the lower middle hole, push the needle through about five pages. Pull the thread through until the knot is snug against the pages. Go back out to the front cover by pushing the needle up through the awl hole. This step anchors the thread.
- Now sew the rest of the book as shown in the accompanying illustrations. Pull the thread tight each time you go through a hole.

Go around the back and back up through the starting hole, then down through the other middle hole. Pull the thread tight after going through each hole.
Around the back again, then up through the top hole.
Around the back, then...
...around the top of the spine and up through the top hole again. Keep going, down through one middle hole, back up through the next, and down through the bottom hole. Keep the thread tight.
Around the back again and...
...around the bottom of the spine and back through the bottom hole. Go up through the starting hole again.
To finish, tie off the thread so the binding won't come loose. Do this by slipping the needle under two of the top threads coming out of starting hole and back through the loop to form a tight knot.
Run the needle back down through the starting hole and cut the leftover thread flush with the back of the book.
Source: Sff.net
| The Essential Guide to Making Handmade Books: Gabrielle Fox | |
 | Maybe it's because the book as physical object seems threatened these days that people are becoming more interested in the art of making books by hand. And it's an art available to almost anyone--for many traditional types of handmade books no special skills are needed, and no materials are required that cannot be found in a good art supply store. Fox, who owns a bookbinding studio, presents 11 projects that even the complete beginner should not find too daunting. was $24.99 now $17.24 | Buy Now |
59. Vintage Paper Toys (ca. 1922)

First published in the LA Times ca. 1922-23, these mechanical paper dolls are predictable in their kitsch and stereotypes, but still fun to put together:
- Tillie The Typest
- Lee Ling, The Chinese Laundry Man
- Halfback Harry
- Santa & his Reindeer
- Peggy Plays Peek-a-boo
- Kelly the Cop
- Chris the Crossing Watchman
more...
Source: Barnacle Press
58. Easy Felt Eyeglass Case

MATERIALS
- One piece of felt (or felted fleece)
needle
scissors
thread or embroidery floss
eyeglass case pattern (PDF)
INSTRUCTIONS
- Print out the eyeglass case pattern, making sure not to reduce the size when printing.
- Using the eyeglass case pattern, cut out your piece of felt
- Fold the felt in half, lining up all edges
- blanket stitch the edges, sewing the side and bottom edges together, and leaving the top open:
BLANKET STITCH INSTRUCTIONS:- Stitch the thread into the layers of felt so that it can't be seen.
- Push the needle out of the felt and below the edge of the eyeglass case on the outside.
- Bring the thread up and around the cut edge to the opposite side and push the needle in.
- Push the needle straight up toward the top edge and through the middle of the thread.
- Move the needle over however wide you want your stitches to be and push the needle straight down into the top edge and back out the outside 1/2 inch down. Reapeat steps 3-5 until you have the complete edge stitched in the blanket stitch.

- Stitch the thread into the layers of felt so that it can't be seen.
Source: Owning-Alpaca.com
57. Gifts for Bird Lovers: Embroidered Birds

Use these bird embroidery patterns from MarthaStewart.com to embroider tea towels, eye-glass cases, pillows, or other linens.
56. Gifts for Bird Lovers: Soda Bottle Bird Feeder

2 Liter Bird Feeder
- MATERIALS
- Remove the label from your soda bottle, and rinse it with the cap in hot water to remove any stickiness.
- When they are completely dry, drill two holes into the bottom of the bottle and thread wire or cord through the two holes to make a loop for hanging the feeder. Make sure you cover the holes with duct tape or fill them with clear caulk (or hot glue) to ensure no water can get inside.
- Turn the bottle upside down (the cap will be at the bottom).
- Drill two holes on opposite sides of the bottle, making sure that they are no larger than the thickness of the dowel you have.
- Slip the dowel through the bottle for an instant perch.
- Drill holes 1 to 2 inches (2.6 or 5.6 centimeters) higher than the perches, so the birds can easily access the holes — but don't make the holes too big, or the birdseed will fall out.
Hint: Fill the bottle with water and freeze it over night - this will make drilling the holes much easier.
Seed:- The best overall seed is the black oil sunflower: "High in oil, this seed is eaten by most birds. We find it less messy than striped sunflower seeds, as well,"
- Two-litre soda bottle with a screw-top cap (you can also use larger plastic juice bottles)
Wire (or heavy duty cord)
Drill
Wooden dowels
Clear caulking Adhesive, duct tape, or hot glue
Bird seed
INSTRUCTIONS
Resource: Microsoft Magazine
Combine this with a bird watching guide, and a bag of bird seed for a wonderful present.
| The Audubon Backyard Birdwatcher: Birdfeeders and Bird Gardens | |
 | Discover how to create a backyard bird sanctuary with the expert guidance of the National Audubon Society. Your backyard will come alive by applying these feeding and gardening techniques. Includes a photographic guide to the birds of North America, as well as the trees and plants that attract them. The ultimate resource for anyone interested in creating a bird-friendly habitat. only $19.98 | Buy Now |
55. Dog Treats | Gifts for Pet Lovers

PEANUT BUTTER BONES
- INGREDIENTS
- 1 package dry yeast
1/2 cup lukewarm water
1 cup mashed potatoes
1 cup milk
1/4 cup molasses
1/2 cup chicken stock
1 cup chunky peanut butter
1 cup whole wheat flour
1/2 cup rye flour
1/2 cup rice flour
1 egg
2 cups all-purpose white flour
DIRECTIONS:
- Preheat oven to 325 ° F (165 ° C).
In a large bowl, dissolve the yeast in water. In a large saucepan, mix together the potatoes, milk, molasses, stock, and peanut butter. Heat, stirring frequently until boiling. Remove from heat and let cool to room temperature. Add yeast mixture. Gradually blend in the egg, wheat, rye, and rice flours. Add enough white flour to form a stiff dough.
Transfer to a floured surface and knead until smooth (about 3-5 minutes). Shape the dough into a ball and roll to 1/2-inch (12 mm) thick. Using cookie cutters, cut out biscuits. Place on ungreased baking sheets, spacing them about 1/4-inch (6 mm) apart. Gather up the scraps, roll out again, and cut additional biscuits.
Bake for 45 minutes. Let cool overnight. Makes several dozen bones that freeze well--and have the consistency of pizza crusts, a favorite snack for most spoiled dogs!
PEANUT BUTTER 'N HONEY OAT CRUNCHIES
Corn, Wheat, & Yeast Free
- INGREDIENTS
- 1/4 cup honey
1 cup crunchy peanut butter
2 cups chicken broth or water
1/3 cup peanut oil 1 cup rolled oats
1 cup oat bran
3-4 cups oat flour
DIRECTIONS:
- Preheat oven to 350 ° F (180 ° C).
In a small dutch oven or large saucepan, combine honey, peanut butter (try to find a brand that has no added suger, salt or other ingredients; ideally it should only contain peanuts), chicken broth, and peanut oil. Heat, stirring often, until mixture begins to simmer. Remove from heat. Stir in rolled oats and oat bran and let cool until lukewarm -- or cool enough to work with. Gradually blend in oat flour, adding enough to form a stiff dough.
Transfer to a floured (oat flour or rye flour) surface and knead until smooth (about 3-5 minutes). Shape the dough into a ball, and roll to 1/4-inch (6 mm) thick. Use a mini-cookie cutter or cut into small squares. Transfer to ungreased baking sheets, spacing them about 1/4 inch (6 mm) apart. Gather up the scraps, roll out again, and cut additional biscuits. If the dough becomes too crumbly to work with after a few rollings, sprinkle with a little water to bind it together and knead it for 30 seconds or so.
Bake for 30 minutes. Remove from oven and turn over. Bake for an additional 30 minutes, or until golden brown on both sides. After you finish baking all batches of biscuits, turn off the oven, spread all the biscuits in one baking pan and set them in the oven to cool for a few hours or overnight. The extra time in the oven as it cools off helps make the treats crispier. These make a more delicate crunchy biscuit, so we use them more for special or training treats, not tartar control.
Makes several dozen small treats that keep and freeze well.
Source: Two Dog Press
54. Origami Ornaments

Photo by afotographie.
MATERIAL:
- Origami Paper
- You can print your own here
string or thread
INSTRUCTIONS:
- Click here to learn how to fold a paper Crane (PDF).
- Once folded, pierce a small hole through the crane's back and thread your string through it, tie the ends together to form a loop.
The crane is a symbol of:
- Happiness and good omen
- Long Life
- Fidelity
- Peace
53. Bottle Cap Magnets

MATERIALS:
- metal bottle caps from soda or beer bottles
Photographs or photocopied images, magazine pictures, comic book pictures, etc.
White glue
Round magnets
Hot glue gun (with hot glue stick)
EnviroTex Lite or Ultra Glo varnish kit (includes varnish and hardener & can be found at craft stores), or other clear / non-yellowing sealant
DIRECTIONS:
- Cut your image(s) to fit inside the bottle cap.
- Using the white glue, adhere image to the inside of cap - make sure the image is smooth and there are no air bubbles or wrinkles
- place a little glue on top of the image, smooth, and let dry
- Cover image with EnviroTex, or varnish and let cure for 24 hours (make sure you follow the directions on the label).
- Using the glue gun, attach the magnet to the bottle cap
* You can also drill a small hole in the top of the magnet & attach a small O-ring for a cord (to make a necklace) or a key chain
Resources: AZOnline, Bella Online
52. Mini Herb Kits

MATERIAL
- Mini Terra cotta pots
Patio paint (optional)
Potting soil
mini cello bags
Herb seeds
Kraft paper coin envelopes
Paper mache box or other container
Assorted rubber stamps, paints, etc.
INSTRUCTIONS
- Paint the pots if you like or you can take a permanent marker and write the name of the herb around the rim.
- Fill mini paper, or clear candy bags with enough potting soil to fill all the pots in the kit.
- Decorate coin envelopes, fill with assorted seeds, seal, then label.
- tip: use mini return address labels, printed with name of herb in packet, to seal envelope.
- place ingredients into a decorated paper mache box. Old tins, recycled boxes, even old lunch boxes, would also make nice containers for the mini garden
resource: off beat living
| The Herbal Kitchen: Cooking with Fragrance and Flavor | |
 | The secret to transforming easy dishes into extraordinary meals? Fresh herbs. In The Herbal Kitchen, IACP award-winning cookbook author and acclaimed Herbfarm Restaurant chef Jerry Traunfeld presents simple dishes using herbs straight from the market, windowsill, or garden. was $34.95 now $23.07 | Buy Now |
51. Personalized Photo Book

There are several online services that allow you to upload your photos and create a professionally printed custom photo book:
Qoop: If you're a Flickr user, this is an easy one because it automatically retrieve's your photos from Flickr. You decide if you want double sided pages (12.99 + 0.40 each add'l page) or single sided pages (11.99 + 0.35 each add'l page), you choose the layout, titles, etc.
iLife: If you're a mac user, you can upload your photos from iPhoto, choosing various templates, titles, etc. Books range from 9.99 to 29.99 depending on their size and style of cover.
Picaboo: For Windows users. Download the free software and create your own layout. You can choose your size, style, and book cover. Books range from 9.99 to 39.99.
Birthday Gifts For Mom
My mom's birthday is just round the corner. I am planning a surprise party for her. She loves to work in the garden, so I decided to arrange a garden party. All her friends are invited. I had requested them to pot, plant and nurture a special shrub or flower for my mom, and bring the plantling over as a gift for their wonderful old friend, my mom. She is sure to love that.
Whenever I notice the joy on her face when she digs in deep, getting her hands all dirty with mud but not once flinching, I just cannot resist but love her all the more. These are the precious moments in her life that rejuvenate the child within.
Here is a list of gifts for those special moms we cannot thank enough for bringing us into this beautiful world.
We are all planning to flood her mailbox with Birthday Ecards on D-day. Have to rush with the party preparations. So no tranquility for me right now. Wish me luck.
Whenever I notice the joy on her face when she digs in deep, getting her hands all dirty with mud but not once flinching, I just cannot resist but love her all the more. These are the precious moments in her life that rejuvenate the child within.
Here is a list of gifts for those special moms we cannot thank enough for bringing us into this beautiful world.
- Cabernet Grape Bonsai Tree ($84.99)- Truth, goodness, and beauty are considered to be the three basic virtues necessary for the creation of a bonsai. Your mom has shown these virtues many times over in her role as a homemaker. This little plant reflects your admiration for her undying efforts.
- Candles and candle Holders- Relaxing and soothing for the mind and the spirit. Diana Vase/Tealight Holder ($26.95 ), 3 LT. Floating Candles - 3 Light Floating Candles/Holder($17.99 )
- Heated Massage Mat with Neck Therapy ($!49.95) – Its warm massaaging action releases all the tension in her muscles reducing stress, inducing her to sleep like a baby.
- Philips Keychain Digital Camera ($19.95)- For all gadget lover moms. But hey, nothing can be more enjoyable than clicking away pictures of your loved ones and keeping them beautifully laid out in an album for constant viewing and reminiscing.
- Another great idea is arranging for a three day cruise with best friend or dad. After all, mom deserves a few days off for fun and relaxation.
- Or plan a romantic picnic for your parents. Pack up a backpack full of cheeses, bread, wine and water and send along a map to a special place, maybe where they met for the the first time.
- Cheers Champagne flutes- Fluent in the international language of celebration, these glass champagne flutes are etched with traditional toasting words: "cheers" in English, "sante" in French, "salute" in Italian and "prost" in German. Together they constitute a concoction also called Fun.
- Pearl or Diamond Earrings- To enhance her beauty and keep her cheeks glowing.
- Spa gift basket- A day at the spa will certainly sound unbelievable to her at first but once the truth sinks in, it might become tad difficult to bring her back from the spa but hey its her day, so let her relax and have fun.
- Handmade, Personalized Photo Quilts (upto $200)- I bought one of these for my mom last year. It was an intensely emotional moment for both of us.
- Tranquility Tabletop Fountain ($32.96 - $63.95 )- The name speaks for itself. Tranquil peace, isn't that what any mom would die to possess even if it be for a few seconds? Well, this is sure to fulfil that secret desire of hers.
We are all planning to flood her mailbox with Birthday Ecards on D-day. Have to rush with the party preparations. So no tranquility for me right now. Wish me luck.
50. Personalized Tote

Start with a plain canvas bag from a crafts store, and approach it just as you would (suitably enough) a blank canvas. Do you want to add a modern design? Pretty labels? Handy pockets? The ideas here are just a beginning.
IRON IT ON
Tools and Materials
- scissors
iron-on transfer paper (available at office-supply and crafts stores)
plain canvas tote bag
iron
twill tape or grosgrain ribbon, for handles (optional)
Iron-On How-To
- Cut around images cleanly to avoid making jagged edges. Following transfer-paper manufacturer’s instructions, print images on transfer paper in black or in color and cut them out. Arrange images on bag, faceup, for a preview (keeping in mind this is a mirror image of final design). When you’re ready to iron, place images facedown. Iron over images, starting at edges of each and using even pressure so that the image doesn’t slide. When iron-ons have cooled, remove backing paper. Replace bag handles with colorful twill tape or cover them with ribbon, if desired.
Iron-on templates from Marth Stewart Living: (remember, when copying these onto transfer paper, mirror the image)
Books Template (PDF)
Knitting Template (PDF)

ADD POCKETS
Tools and Materials
- 12 1/2-by-19-inch canvas
tote bag
seam ripper
scissors
fabric for pocket
measuring tape
thread
fabric glue or pins
twill tape or grosgrain ribbon
children’s apron with pockets
Pockets How-To
- Begin by removing existing handles with a seam ripper.
- Make outer pockets: Cut two pieces of fabric 6 inches narrower than width of bag. Cut one of these pieces 2 inches shorter than height of bag. Cut remaining piece 5 inches shorter. Fold over top 1/4 inch of each; hem. Stack small piece onto large piece, aligning at bottom. Center on bag; glue or pin into place. Machine-stitch bottom. For handles, cut two pieces of 1 1/4-inch-wide twill tape twice the height of bag plus 20 inches. Attach with glue or pins, covering sides of pocket. Attach other handle. Stitch along both sides of each tape. Reinforce handles at top and bottom of bag.
- Make inner pockets: Cut off apron top. Glue or pin lower portion in place. Fold over top edge by 1/4 inch; stitch into place.


Source: Martha Stewart
49. Felt Sewing Book

MATERIALS
- One 5 x 7 1/2" piece of Heavy felt
button
Three, 4 3/4 x 7 1/4" pieces of Lightweight felt
needle & thread
Sewing kit items
extra buttons
needles
pins
INSTRUCTIONS
- When clothes need mending, reach for this book—its felt pages are designed to keep sewing supplies organized. Devote one page to extra buttons that come with garments, one to pins, and another to needles (pre-threaded with your most-used colors).
- To make the cover, cut a piece of heavy felt into a 5-by-7 1/2-inch rectangle. Sew a button halfway up one short end, 1/4 inch in from edge. Make the tab closure by cutting a 1 1/2-by 2-inch strip of heavy felt, rounding it at one end. Sew the straight end of the tab to the end of the cover opposite the button, halfway up the cover and 1/8 inch in from the edge; make a slit in the rounded end of tab to serve as a buttonhole.
- For the pages, cut three 4 3/4-by-7 1/4-inch pieces of lightweight felt. Fold each page in half, and iron along the crease. Open the cover, and center the opened pages on top. Close book, and use a blanket stitch to bind cover with pages, 1/2 inch in from folded edge.
- To make the blanket-stitch binding, you’ll need an upholstery needle and embroidery floss. Hold the book in your lap with the fold at your waist, and start in the left-hand corner: Draw floss out through the fold from inside the book. Insert needle down into fabric, 1/2 inch up from fold, 3/8 inch in from edge; bring it out at the edge, as shown, keeping the floss loop under the needle. (See illustration below.) Continue stitching, working from left to right, until book is bound.


Source: Martha Stewart
48. Backpack

This is essentially a fabric box with a lid-flap closure & straps. It looks difficult but is deceivingly easy. Even easier, they suggest using an old wool blanket, "for that rustic look."
The PDF'd Pattern and Instructions can be downloaded here.
Source: Clotildes Sewing Savvy
47. Wallpaper Crafts

WALLPAPER BOOKMARKS
- MATERIALS
- Cut wallpaper into strips measuring approx. 1 1/2" x 6"
- place in laminating pouches, laminate
- trim bookmarks, leaving about 1/4" around sides and bottom, and 1/2" at top
- punch hole at top and thread with ribbon.
- Wallpaper samples
Laminating pouches + Laminator
hole punch
ribbon
scalloped scissors or pinking shears
INSTRUCTIONS

WALLPAPER MAGNETS
- MATERIALS
- Cut wallpaper to desired size and shape
- adhere to magnets
- package magnets in sets to give as gifts
- scrap pieces of Wallpaper
pinking shears
adhesive backed magnets
INSTRUCTIONS

WALLPAPER COASTERS
- MATERIALS
- Cut Wallpaper in 4" x 4" squares. if you like, round the corners off
- place into lamination pouches and run through the laminator
- trim lamination, leaving at least a 1/4" border
- bundle into sets of 4 or 6, tie off with a ribbon or make a paper sleeve (see above)
- Wallpaper
Scissors
Lamination pouches + Laminator
INSTRUCTIONS
Source: Tony Meredith
46. Alternative gift ideas for the tragically hip among us
DUCT TAPE WALLET
JUICE POUCH COIN PURSE
PULP FICTION COIN PURSE
IPOD NANO CASE
- MATERIALS
- Using a dollar bill as a measuring tool, cut two strips of duct tape slightly larger than your bill.
- Join the two strips along the long edge, overlapping them by 1/2 inch.
- Flip the the first strips over and tape the back side, making sure to overlap the outer edges by 1/2 inch.
- Flip it over again and trim the corners at a 45 degree angle.
- Fold the 1/2 inch overlap over to make sealed edges.
- Make a second sheet, this time slightly smaller than the first (but still larger than your dollar bill).
- seal the top edge, but use the bottom and side overlaps to seal this sheet to your first (this makes a pocket & your basic wallet structure)
- To add ID or credit card pockets, you'll make a sheet (just like we did above) that is the same length as your wallet, but about half as tall (you will probably only need one strip of duct tape for each side of the pocket)
- Cutting board
Duct Tape (any color)
Ruler
Exacto knife
INSTRUCTIONS
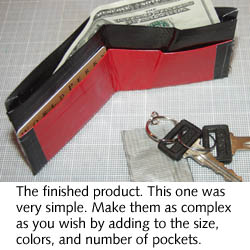
For more images go to The Duct Tape Guys
Source: The Duct Tape Guys

JUICE POUCH COIN PURSE
- MATERIALS
- Carefully cut the sides, top, & bottom of the drink pouch, so that the front and back are now two separate pieces. If you like, with the scissors, go ahead and round the edges of the top and bottom (see picture above)
- rinse with water, making sure the pouch pieces are clean, and pat or air dry.
- Fold each of your pouch pieces into thirds. One will be the front of your purse, the other will be the back, with the velcroed flap.
- For the front of your purse: keeping the top third folded back, unfold the bottom third, so you now have two-thirds of the pouch showing.
- With your sewing machine, stitch the top (folded) edge
- Sandwich the two pieces together, right sides out, and stitch around the edges using a zig-zag pattern. (you may need to tape the pieces together to make sure they don't slip while you're sewing. If you like, fold the finishing tape around the edges before you begin stitching, to give it a more finished look
- Attach the velcro on the underside of the flap, and on the front of the purse.
- Empty drink pouch
Scissors
Velcro
Finishing | hem tape
needle, thread &/or sewing machine
tape
INSTRUCTIONS

PULP FICTION COIN PURSE
- MATERIALS
- Remove the cover from the book.
- Cut your book cover, paper, and vinyl so that each measures 7" by 4"
- Find the middle of the book cover and mark it with a horizontal line.
- From the top, measure one inch down and make another horizontal line.
- Do the same for the bottom.
- Now fold along the lines you made.
- Place the vinyl over the book cover, lining up the edges. Use paper clips to hold them together as you attach the snaps.
- Using the same measurements as Steps 3-6, mark three horizontal lines on your paper and fold.
- Getting out your paper clips again, place the paper lining on top of the book cover, fold over the edges, make sure it is all even, and clip the folded edges in place.
- Make sure the paper clips are not in the way of your needle before you start sewing. By sewing the edges together you
are attaching the lining to the book cover and forming the pockets by way of the folded edges.
Sew as close to the edge as you can.
You may choose to use a contrasting color of thread of decorative stitches.
- One paper back book.
- The cheesier the cover, the better. Paperbacks come in a variety of sizes, but look for one that is at least 7" high and 4" across.
Sturdy paper or card stock.
Clear vinyl
Snap Faster Kit. check your fabric store around the velcro and other closures.
Sewing machine & thread
INSTRUCTIONS
Source: Eat Your Heart Out Martha

IPOD NANO CASE
- MATERIALS
- Print out the iPod Nano Pattern
- Use it to cut out the pattern on whatever material you're using. If using duct tape, place tape directly on the back of the pattern and trim.
- If you would like a protective window over your iPod Screen, place clear packing tape on both sides of the window opening.
- Fold along the dotted lines, & glue or tape the flaps in place.
- iPod Nano Pattern (PDF)
glue or tape
exacto knife
ruler
You can use any material to make the cover:
- cereal boxes | paper board
duct tape
fabric | felt
vinyl...
INSTRUCTIONS
Source: Sneakmove.com
45. Custom Recipe Cards

MATERIALS
- The recipe of your choice
A digital image you'd like to upload
Adobe Reader software
Cardstock or Photopaper for an Inkjet Printer
Inkjet Printer
INSTRUCTIONS
- HP has created an interactive, customizable recipe card maker, all you have to do is choose your design, type in your recipe, upload a photo (of yourself, or your dish), save & print!
Click Here to get started >> makes 4x6 inch cards.
tip: if you want to make them "spill proof" you can laminate them with self-adhesive laminate sheets
If you just want to give blank recipe cards, here are some fun ones:
RETRO RECIPE CARDS - Black and White designs (PDF)
Source: Craftster.org
COUNTRY THEMED RECIPE CARDS
Subscribe to:
Posts (Atom)